Do you want to print screen or screenshot your PC like you do with your phone and wondering how to get it done. Below are a few steps you can take to screenshot on a PC.
How to Screenshot On a PC
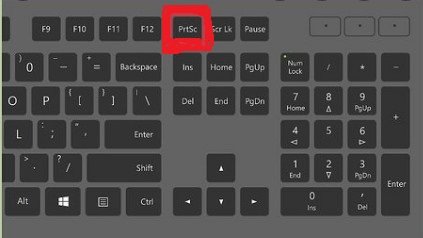
- Print Screen Button: Tap the Print Screen button (located in the top right of the keyboard) to take a screenshot of the entire screen. This will essentially copy an image of the screen to the clipboard. Afterwards, open Word, Paint or some other image editing program to paste and view, edit or save the image.
- Snipping Tool: If you are having difficulty locating the Print Screen button, you can alternatively use the Snipping Tool program to take and edit screenshots. Snipping Tool is a program that is included for free with Windows 7. This program allows you to take screenshots easily by clicking New and then selecting the area that you’d like to screenshot. You can then edit the screenshot, using highlighter and pen tools.
- Command Keys: Also, you can screen shot your PC even if you do not have a Print Screen screen. Check your user manual for instructions on different key combinations that can be used for taking screenshots.
Hit the Command, Shift and 3 keys together to take a screenshot of the entire screen. This screenshot will be automatically saved to your desktop. Press the Command, Shift and 4 keys together to take a screenshot of a selected area. - Grab Tool: Use the Grab tool to take a screenshot. Grab is a program that is included for free with Macs. It allows you to take screenshots easily by clicking Capture and then selecting the type of screenshot that you’d like to take. Grab is just one of the numerous tools available to assist you in taking screenshots.